Showing posts with label tutorial. Show all posts

Cropped Wyler Hoodie Pattern Hack

Tuesday, November 10, 2020

Cropped Wyler Hoodie


Now that the Wyler Hoodie Sew Along has wrapped up, it's time to play with hacking the Wyler Hoodie sewing pattern. For my original Wyler Hoodie, I made the sleeveless vest style adding my typical 1/2" in length.

Wyler Hoodie Waistband Tutorial

For a fun hack of the pattern, I created a cropped version with an elasticized waistband. Simple and sporty.

The photo above is the inspiration behind this style. 


I wanted the look of the waistband with casings, and I have a tutorial for creating it below. For more gathers like the inspiration image, you would need to cut the waistband pieces wider than the pattern pieces.

Blank Slate Patterns Wyler Hoodie

To achieve the cropped look, I cut down the bodice pattern pieces by 3". I omitted the pockets since they would fall at an awkward height with the shortened bodice.

Waistband Sewing Tutorial


To create the elasticized waistband, sew the two waistband pieces right sides together at the short ends. Press the waistband in half wrong sides together. Divide the waistband in three sections, mine are about 1 1/4" apart, taking into account the 1/2" seam allowance to attach the waistband. Stitch two rows to create the casings with a stretch stitch. Leave a 2" gap in each row.


Insert elastic in the bottom two rows sewing the ends of the elastic together. Stitch the casings closed. I used 1" wide knit elastic. I judged the length of the elastic based on where the waistband would hit on my body. For ultimate customization, I even made the top elastic a bit shorter than the rest based again on where it hit on my body. A safe estimate is also to cut the elastic to match with width of the waistband.

For the top casing, sew the elastic into a circle and insert it between the two layers of fabric. Pin the elastic as close to the stitching line as possible. 


Place the waistband right sides together with the bodice and stitch along the raw edges being careful not the catch the elastic in the seam.


Done!


 As an added bonus, the extra elastic in the waistband gives a degree of tummy control, and who doesn't love that!

How to Sew a Fully Lined Tank

Wednesday, September 9, 2020

how to line the hathaway tank

The Hathaway Woven Tank Sewing Pattern by Blank Slate Patterns is drafted with bias tape finishes at the neckline and armscye resulting in an easy, breezy tank. When is comes to sheer or eyelet fabrics, however, you may want to include a full lining. Let me walk you through the process of sewing a fully lined Hathaway Tank. 

Lined Woven Tank Tutorial

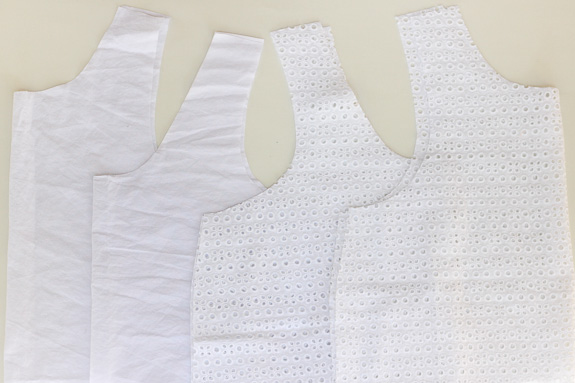
The lining fabric should be something lightweight. I choose a white cotton lawn. Cut the front and back pieces of both the main fabric and the lining. Trim 1/2" from the bottom of the front and back lining pieces to ensure the hem will not show in the finished garment.

Lined Woven Tank Tutorial

Sew the front and back main pieces right sides together with a 1/2" seam allowance at the shoulder. Repeat for the lining pieces. Press all seams open.

Lined Woven Tank Tutorial

With right sides together, pin the lining piece to the main piece. Sew around the neckline with 1/4" seam allowance. Clip the curves the press the seam allowance toward the lining. 

Lined Woven Tank Tutorial

From the right side of the lining. understitch the seam allowance to the lining around the neckline to prevent the lining from rolling to the outside of the garment.

Lined Woven Tank Tutorial

Here is where we are going to employ the "burrito method" to finish the armscye. With the tank flat, roll the fabric from one side to the opposite strap like you are rolling up a burrito with the filling inside. With the bodice rolled inside, you can pin the armscye right sides together. Stitch with a 1/4" seam allowance all around the armscye. Repeat for the other armscye. Clip seams and turn right side out and press well. 


The burrito method is a bit challenging to show in photo format. Melissa Mora of Melly Sews has a great video to demonstrate the process.

Lined Woven Tank Tutorial

Open up the tank. Align the side raw edges right sides together. Make sure the front lining is right sides together with the back lining, and the main front is right sides together with the main back. Sew the side seams with 1/2" seam allowance from the hem of the lining to the hem of the main fabric.

Lined Tank Tutorial

The last step is to hem the lining and main pieces independently. 

How to line the Hathaway Tank
** This post contains affiliate links.  By purchasing through my links, I receive a small compensation 
which I will in turn use to share more inspiration with you.**

Easy Bias Binding Tutorial with the Hathaway Tank

Thursday, July 9, 2020


The Hathaway Tank by Blank Slate Patterns is a great basic tank sewing pattern for woven fabrics. The pattern includes a store bought bias tape binding finish for the neckline and armholes. When sewing with delicate fabrics, I like to use self fabric bias binding or facing. "Self fabric" just mean the same fabric as the garment. 


What makes this an easy bias binding method is that you don't have to press that delicate fabric into multiple folds before you attach it. Any tip that speeds up a sewing project is a benefit in my book.


The fabric for this Hathaway Tank is Telio Verona Cotton Rayon Voile. The fabric is thin without being too sheer. For my size medium tank, the pattern only required one yard of fabric with enough scraps to cut bias strips for the binding. Let's get to the tutorial!

Easy Bias Binding Tutorial


The easy bias binding tutorial will focus on binding the neckline of the tank, but the same application works for the armholes. You will need to first cut 1.5" strips of fabric on the bias grainline. The total length of your bias tape should be at least as long as the distance around the neckline plus 1". For tips on cutting and connecting strips of bias tape, check out the tutorial from Made by Rae. Once you have your strip, press the bias tape in half wrong sides together. I told you this was easier than creating single fold bias binding!!


Make sure you have sewn in your stay stitching at the neckline before you proceed or you will risk a wavy, stretched out neckline. Pin your folded bias strip right sides together along the neckline aligning the raw edges. It may help to press the bias into the curved shape of the neckline as you go.


Stitch the bias strip to the neckline with a 1/4" seam allowance starting and stopping 1-2" before the ends. Trim the ends as needed so you can create a 1/2" seam allowance along the short ends. 


Open up the bias tape and stitch the short ends right sides together making sure you move the bodice pieces out of the way.  Re-fold the bias tape and press. Join the previous stitching line around the neckline at 1/4" seam allowance. 


Trim the seam allowance to 1/8" and press the seam allowance toward the bias. Understitch the bias tape by stitching close to the seam on the right side of the fabric catching the seam allowance underneath. Understitching helps the fabric to role to the inside of the garment making the bias invisible from the outside.


Press the bias to the wrong side of the neckline and stitch in place next to the inner fold. 


Now your inside looks as pretty as the outside!! Bias facings in self fabric or even a fun contrast fabric are a great way to get a professional and personalized finish.


** This post contains affiliate links.  By purchasing through my links, I receive a small compensation 
which I will in turn use to share more inspiration with you.**

Zipper Heart Pocket Monroe Turtleneck

Friday, March 6, 2020


Two days before Valentine's Day, I saw someone at my bible study wearing this sweater. I determined to make one for Valentine's Day, as one does. Am I right?!? Nothing like a last minute sewing project.


My friend had said she received the heart sweater as a gift last year, so I didn't think I would actually be able to find the inspiration image, but my google search was successful. It is currently on sale at Neiman Marcus for $180 down from $245. Yikes! 


I wanted to mimic the slightly boxy, dropped shoulder style. I knew the Monroe Turtlneck pattern I had just made would be the perfect starting point. With only 4 pattern pieces, it is a breeze to sew. 


Of course the hack took a bit more effort. First, I color blocked the sleeves. Next, I scooped out the neckline and swapped the turtleneck for a neck band. Finally, I reduced the style ease in the body of the Monroe Turtleneck pattern from the size 2 to a size 1. Sizing down would have made the sleeves too short and tight. Reducing the style ease made for a loose, not too boxy fit. Adriana wrote a great article differentiating the types of ease. Be sure to check it out!

The olive sweater knit fabric came from a warehouse in Dallas. I followed Melissa's helpful tips for sewing with sweater knits with great results. 


The star of the show is of course the heart zipper pocket. While it is fully functional, I'm not sure I would really use it for storage. The pocket might come in handy for a lone key or stick of gum. Let me know if you would like to see a full tutorial on this zipper heart pocket. Basically, I used two heart shaped pieces of woven fabric. After attaching the exposed zipper to one, I sewed the hearts right sides together and turned it right side out through the zipper opening. I reinforced the wrong side of the sweater knit where I would attach the heart, and topstitched around the edge to secure the pocket to the sweater. Even with the hacks, the heart sweater came together in just enough time for me to wear it to classroom parties on Valentine's Day. I call that a success!

Shoreline Boatneck Dress with Tie Sleeves

Tuesday, June 11, 2019


Just shy of one year ago I posted a tutorial for a fun bow sleeve tutorial over on the Melly Sews blog. For that version I sewed up a top in a dainty floral print. This striped dress version is more my style! I love the bold casual style of a striped knit tee dress. Highlighting a different look is the perfect way to bring the bow sleeve tutorial home at the end of this post.


The dress pattern is a slightly modified Shoreline Boatneck dress by Blank Slate Patterns. I mostly slimmed the pattern a bit in addition to adding the bow sleeve hack.


During a recent trip to Louisiana, we stopped on a walk to snap some photos next to this pretty magnolia.


During hot summers, dresses are in heavy rotation in my wardrobe.


Ready to add a bow to just about any t-shirt sleeve?!?

Bow Cuff Tutorial


To create the bow cuffs, cut 2 strips of knit fabric 4" x 42" with the stretch in the long direction. Sew up your tee according to the pattern instructions except do not hem the sleeves. Remember, we are adding the finishing touch here! All seam allowances are 1/2" unless noted otherwise.


Next, measure the circumference of the sleeve (mine measured 14"). Mark the sleeve at the center opposite the underarm seam. Then, mark 1" to either side of the center. This section will remain unstitched when we add the cuff.


On the cuff, measure half of the sleeve circumference from the center fold and cut a 1/2" notch into the seam allowance top and bottom. For my example, I measured 7" from the center fold of the cuff to my notches.


Fold the cuff right sides together and cut each end at a 45 degree angle.


Stitch from the notch to the angled point at each end of the strip. Trim the seam allowances. The center length that will attach to the sleeve should be unstitched.


Turn the cuff right sides out and push out the points. Press well.


Pin the cuff right sides together with the sleeve starting with the center of the cuff at the underarm seam. Continue to pin around the sleeve. The notches should fall at the marks you made 1" from the top of the sleeve. Stitch the cuff to the sleeve from notch to notch with a 1/2" seam allowance.


Press the seam allowance toward the sleeve. Also, press the unstitched section between the notches to the wrong side. Topstitch the seam allowance all the way around the sleeve to secure. Tie a bow and you are good to go!


If you've made it this far, which version is your favorite, floral or stripe?
** This post contains affiliate links. By purchasing through my links, I receive a small compensation which I will in turn use to share more inspiration with you.**
Proudly designed by Mlekoshi playground